In the last post, we explored how to move from a mapped problem space to a defined opportunity – flipping real user pain points into validated propositions. If you’ve done that work well, you should now have:
- A clearly defined Problem Map
- A focused Opportunity Map
- A handful of Opportunity Statements you’ve tested with real users
At this stage, it’s easy to feel like you’re ready to start building. But before diving into CAD or printing your first prototype, take a step back.
Because now we’re shifting the focus from “Should we build this?” to “Can we build this?” – and there’s a right (and wrong) way to approach that question.
1. Prototypes Are a Means to an End
Prototypes aren’t the product. They’re tools – designed to answer questions, reduce uncertainty, and build confidence.
Yet, in hardware development, it’s easy to get swept up in aesthetics or functionality too early. Prototypes become ends in themselves. Time and money disappear into beautiful-but-pointless models.
The key is to stay focused on learning. Every prototype should exist to test a specific assumption or mitigate a specific risk.
2. Define What Matters: From Opportunity to Specification
Before building anything, you need clarity on what “success” looks like. That means translating the opportunity into a clear product specification.
You don’t need a 30-page document at this stage – but you do need a structured way to link your intended user outcomes to what the product actually needs to do.
Here’s how I break it down:
User Requirements (URS)
What outcomes do users need?
E.g. “User must be able to continually use product for length of procedure”
Product Requirements (PRS)
What must the product deliver to meet those outcomes?
E.g. “Battery must last 2 hours under peak load.”
Every PRS item should trace back to your opportunity map. If it doesn’t serve a real, validated user need, question whether it belongs.
This process is worth a deeper dive – and I’ll cover that in a future post. For now, just focus on clarity, traceability, and testability.
3. Mitigating Risk: What Are You Trying to Learn?
Once you’ve sketched your initial spec, your next task is to ask:
What could go wrong?
Product development is really a process of de-risking – both for you and for future investors, partners or grant funders.
Some of these risks relate to users:
- Will they adopt the product?
- Will they understand and use it correctly?
- Will it work within their real context or workflow?
Others are technical:
- Can the product deliver the performance you need?
- Can it be built safely, reliably, and cost-effectively?
Revisit your Problem and Opportunity Maps. Are there assumptions that still haven’t been tested? These are your candidate risks.
For each risk, ask:
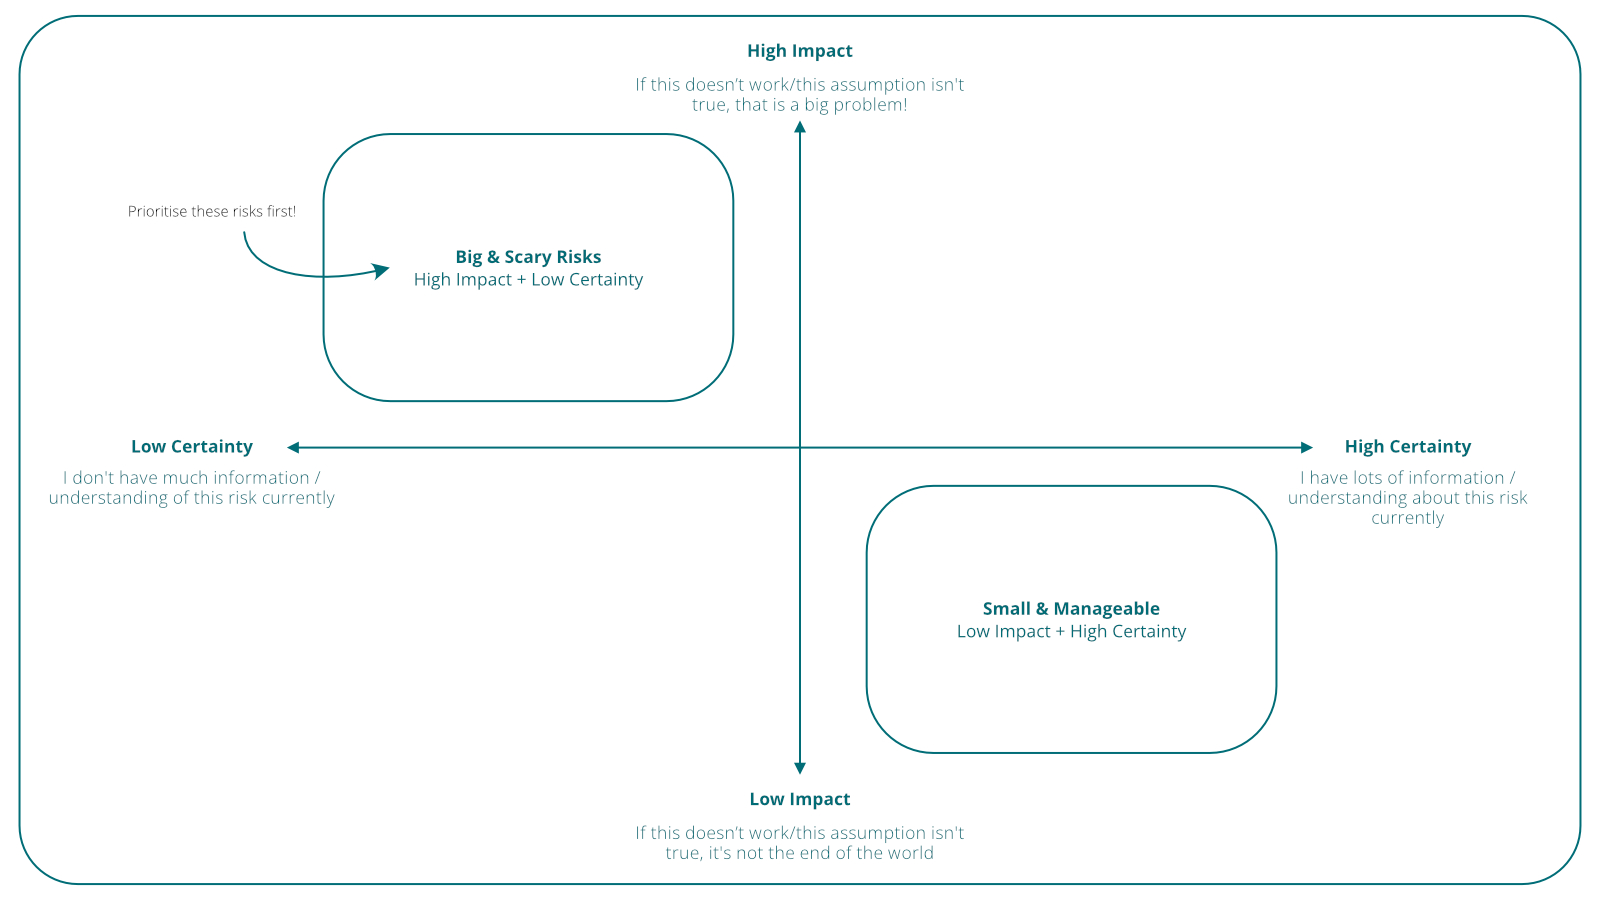
- Impact – What happens if this fails?
- Confidence – How sure are we that it’ll succeed?
This gives you a prioritised list of “big scary unknowns” vs “manageable concerns.” Focus your prototypes on the former.
The following risk matrix can be helpful to map out the various risk and identify which ones to prioritise:

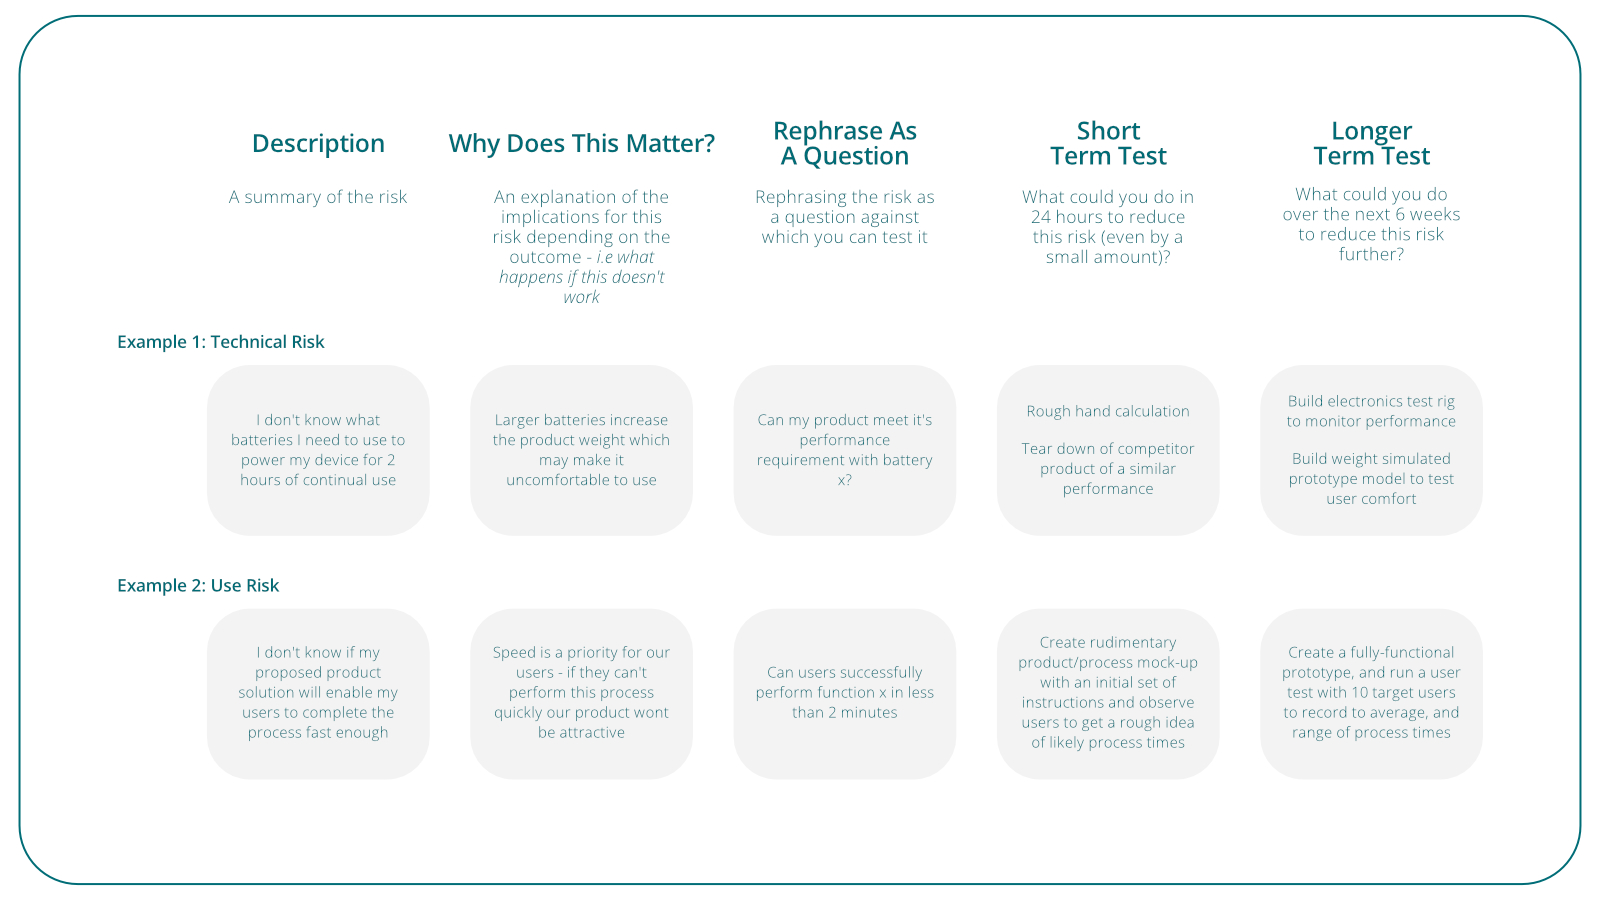
The for larger risks, we can then explore them a little further to understand how best to approach them.
I use the following structure to explore each risk and ask what we can do both immediately, and over the longer term to reduce it/remove it as a risk all together
This structure helps you avoid overbuilding too early and makes it easier to justify your approach to stakeholders:

4. Choosing the Right Prototyping Approach
Once you’ve mapped out your key risks, match each one with the right prototype or method to test it.
Some risks don’t need a physical prototype at all. If you’re testing desirability, usability, or perception – consider:
- Sketches
- Renders or animations
- Mock product pages or explainers
Sometimes, high-fidelity prototypes can actually distract from what matters – especially when testing early-stage assumptions.
For more technical or performance-based risks, you may need something physical. Here’s a quick guide:
Space Model – Test form factor, scale, or ergonomics
Looks Like – Communicate visual design to stakeholders or users
Works Like – Test function or performance
Looks + Works Like – Validate form and function in real or simulated use
I’ll cover prototyping tools and materials in a future post. For now, just choose the lightest-weight method that gives you a reliable answer.
5. Prototyping in the Real World
Your prototypes should leave the lab as early as possible.
It’s one thing to see a test rig work on a desk. It’s another to watch a user fumble with it in the wild.
Test in context. Observe real use. Listen to confusion, hesitation, and workarounds. Every awkward pause is a clue.
Even if your prototype is rough – especially if it’s rough – you’ll get invaluable insight. And you’ll often uncover risks you didn’t know existed.
Conclusion: Build to Learn
Hypothesise. Build. Test. Learn. Repeat.
That’s the rhythm of good product development.
A prototype that “fails” can be more valuable than one that “succeeds” – if it tells you something you didn’t know before.
Stay focused on your spec, your maps, and your users. Keep your eyes on the risks that matter. And build only what you need to move forward with confidence.
In the next post, we’ll shift our attention to the final stage of the early-stage journey: preparing for production – and why you should start thinking about it much earlier than you think.
🚀 This post is part of a wider guide I’m developing to help research-led innovators move from idea to impact.
📥 A downloadable version of this guide – plus bonus tools and templates – will be available soon. Watch this space!
💬 Have questions about your product idea or want to chat about your approach?
You can book a free 1:1 call with me here.

