In the last post, we explored how successful products start with a clear understanding of real problems, not just clever technology. If you haven’t already taken a look, check-out blog 1 here. You defined a use scenario, gathered first-hand insights, and mapped out the problem space. That’s the foundation of good product development.
Now comes the next step: figuring out what to build, or whether to build anything at all.
It’s tempting at this stage to jump straight into features and product ideas. But not every problem needs to be solved by a product. And not all products are the right solution. Sometimes a better process, a different service, or a simple behavioural change might be more effective. This is why staying open and solution agnostic is so important.
In this post, I’ll walk through how to identify opportunities worth pursuing. I’ll also introduce a couple of tools I use with teams to help prioritise ideas and avoid rushing into development too early. Many of these ideas are inspired by Teresa Torres’ work in product strategy, particularly her Opportunity Solution Tree framework. Her approach is mostly used in software, but it has real value for physical product innovation too. I’d highly recommend checking her work out here for anyone interesting in learning more.
1. Opportunity Maps: Flipping Problems into Opportunities
Before jumping into product ideas or features, it’s essential to step back and ask: What are the actual opportunities here?
These opportunities should grow directly from the problems we identified in the previous stage. If you haven’t read the first blog post, I’d recommend starting there – it walks through how to define use scenarios, identify real user problems, and build a problem tree to map the space.
Now, we’re going to take that work and flip it. We’ll use our Problem Tree as the foundation to build an Opportunity Tree – a powerful tool that helps teams stay focused on solving the right things in the right way.
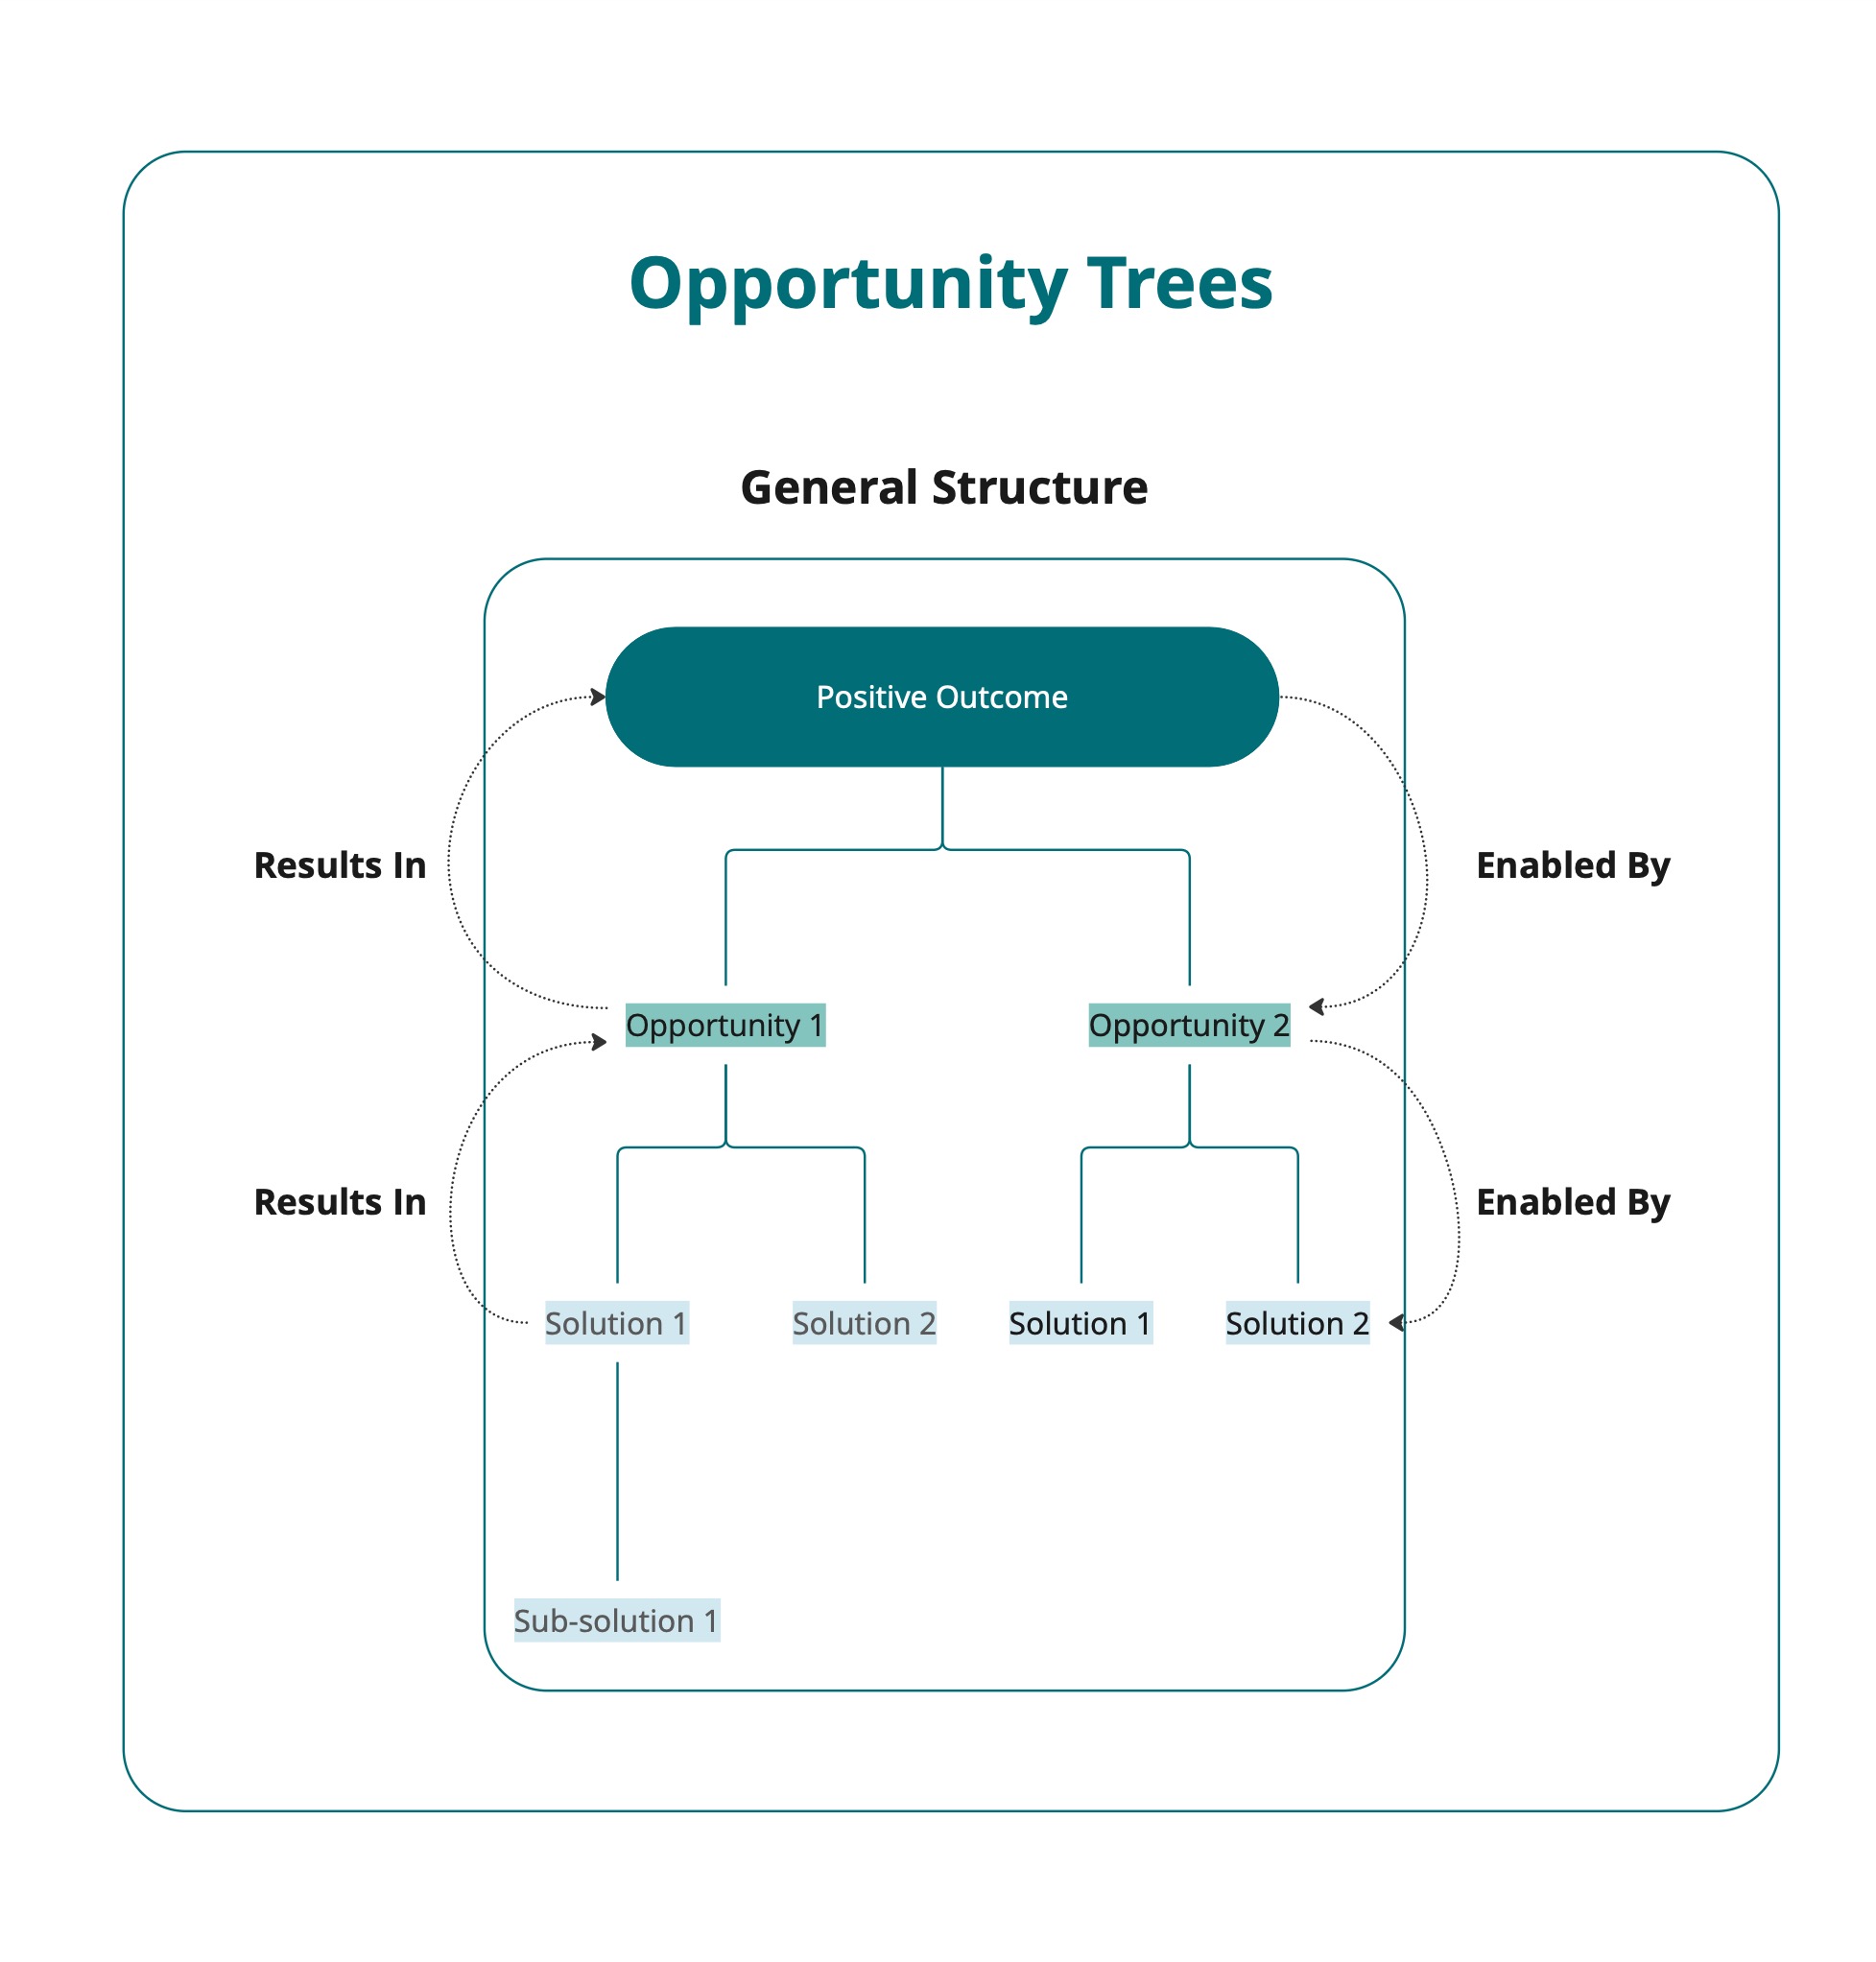
What is an Opportunity Tree?
The Opportunity Tree borrows its structure from the Problem Tree, but instead of mapping frustrations and root causes, it maps positive outcomes, user opportunities, and potential solutions. As mentioned, I came across the original ‘Opportunity Tree’ from Toresa Torres so definitely check out her work if you’re interested in finding out about its origins. I’ve used the same structure, but have been working on a method to build the Opportunity Tree directly from the Problem Tree.
Here’s how it breaks down:
- Positive Outcome – A desirable change or goal from the user’s perspective
- Opportunity – A chance to enable or support that outcome
- Solution – A specific intervention or feature that helps unlock the opportunity
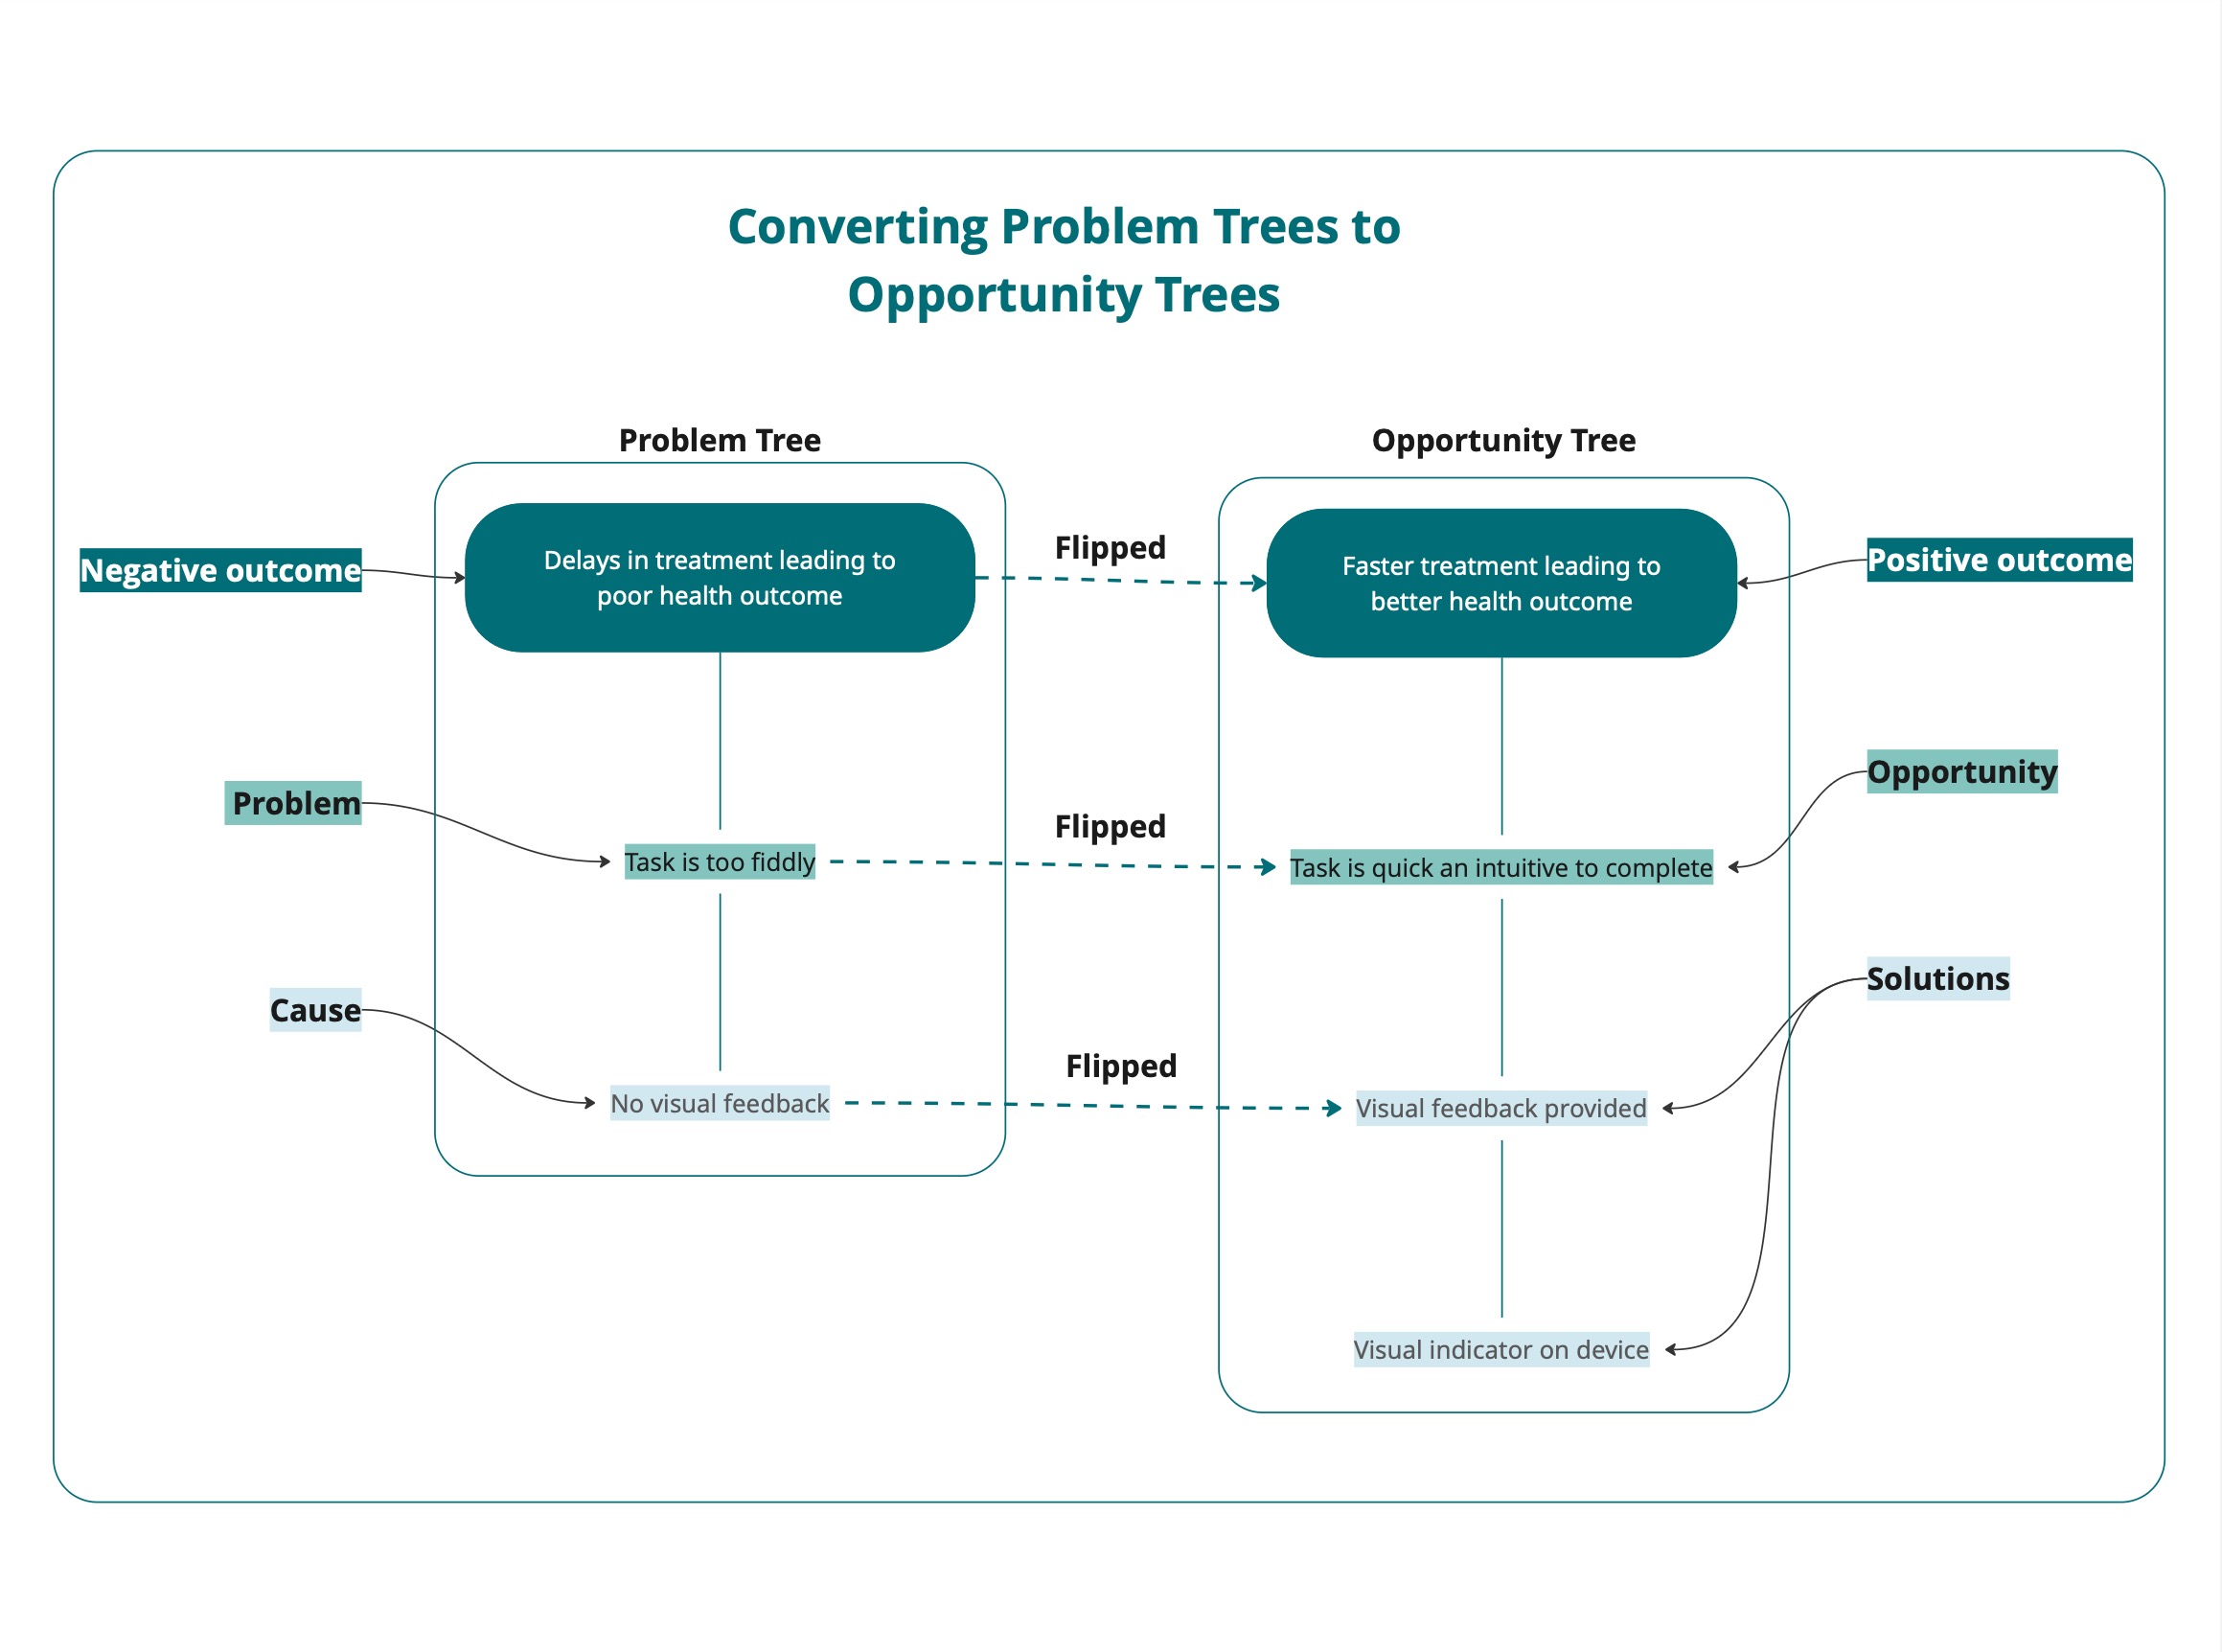
To build one, we’re essentially inverting our Problem Tree:

How to Flip It
-
Start with the outcome
Take the top-level negative outcome from your Problem Tree and reframe it as a positive goal.
Considering a general medical use case we might have:
“Delays in treatment” → “Faster and more timely treatment”
-
Flip each problem into an opportunity
Each problem becomes a chance to make something better.
“Task is too fiddly” → “Task is quick and intuitive to complete”
-
Invert causes into potential solutions
Some solutions will emerge naturally as the inverse of the cause.
“No visual feedback” → “Add a visual indicator”
Others may require more creative thinking – but all should be aimed at enabling the higher-level opportunity.
You can even map these side by side with arrows or colour codes if it helps to see the direct connections between each stage.
A Strategic Filtering Tool
Just like your Problem Tree, the Opportunity Tree will start off filled with assumptions. That’s okay. The purpose here is not to lock in ideas but to test your logic – are your proposed solutions clearly tied to user opportunities and outcomes?
This tree becomes a filter. If a solution doesn’t clearly support an opportunity, or if that opportunity doesn’t contribute to a meaningful outcome, set it aside.
That might mean letting go of ideas that feel exciting or novel. But that’s the point. To build something genuinely useful, we need to prioritise what actually moves the needle for users – not what feels clever in a vacuum.
In short:
If you can’t draw a clear line from your solution to something your users care about, it’s not worth building.

2. Opportunity Statements: Summarising Your Proposition
We now have a Problem Tree and a corresponding Opportunity Tree. This is a great foundation, but it can sometimes feel overwhelming to be looking at so much information at once. Just as we did with the problem space, I find it helpful to distil the opportunity space into a simple, testable format – the Opportunity Statement.
This format helps bring focus to the opportunity you want to explore further and ultimately align your solutions with what users truly care about.
From Problem to Opportunity
Start by referring back to your original problem statement. In Blog 1, we used the following structure:
I am…
I am trying to…
However…
Because…
Meaning…
At first, this was just a hypothesis. But after speaking with users and mapping the problem space, you should now have a more refined version that is grounded in real-world insights.
Now turn to your Opportunity Tree, and begin creating one or more Opportunity Statements using this structure:
Enabling…
To…
Through…
Meaning…
Let’s break that down:
- Enabling… This is your user or user group, drawn directly from your use scenario.
- To… This is the goal they are trying to accomplish – often lifted straight from your problem statement.
- Through… This is the opportunity or solution you want to test. It should relate to the solutions identified in your Opportunity Tree.
- Meaning… This is the expected positive outcome or value that matters to the user.
Remember, at this stage, your Opportunity Statements are still hypotheses. You will likely create several versions, each focusing on a different possible solution. That’s not only acceptable – it’s the point. You’re generating testable options to explore with users.
Example
Let’s bring this to life using the same use scenario from Blog 1:
Problem Statement
I am a nurse working independently on a night shift,
I am trying to care for five intensive care patients,
However, I struggle to keep track of each patient’s changing condition,
Because I don’t have quick visibility of who needs attention first,
Meaning I feel overwhelmed and worry I’ll miss something important.
Opportunity Statement
Enabling night-shift nurses caring for multiple patients
To prioritise care with confidence and speed
Through improved visibility into patient status and urgency
Meaning they can reduce stress and respond faster to those who need it most
You can repeat this process for several branches of your Opportunity Tree. The goal is to produce a handful of clearly framed statements that link a user’s needs to a potential intervention and a meaningful outcome.
Once you’ve got your top few statements, you’re ready to take them back out into the world – to engage with users and test which opportunities resonate most.
3. Users Users Users: Testing Our Assumptions
Once again, we want to keep our end users front and centre. That means putting our assumptions back in front of them – not just to confirm what we think, but to learn what we’ve missed.
Previously, we spoke with users to understand their current experiences and the challenges they face. Now we’ve created our Opportunity Tree and written a set of Opportunity Statements — essentially hypotheses about the value we think we can offer. It’s time to test those hypotheses.
But here’s the trap: it’s incredibly tempting to validate these ideas by asking questions like “Would this work for you?” or “Do you think this is a good idea?”
The problem?
Users are terrible at answering hypothetical questions.
They’re great at describing what they currently do, what frustrates them, what they care about. But ask them to imagine using a solution they’ve never seen – especially one that doesn’t exist yet – and their answers are often unreliable.
That’s why we don’t want to pitch our ideas too early. Instead, we need to go back to the trees and test the links between each level:
Does this cause really lead to that problem?
Does solving this opportunity really create that outcome?
As with our earlier conversations, we want to keep our interviews open-ended and grounded in real experiences. Don’t just run through a list of features. Instead, return to the problem space, and keep exploring how real users experience the issues you’re trying to solve. In doing so, you’re also validating your opportunity space – because the two are deeply connected.
Your goal isn’t to get users to say “yes” to your solution. It’s to see whether their lived experiences support the logic of your assumptions.
If they do – great. If not, that’s even better. You’ve just saved yourself time and money.
A Note on Propositions
While we might not test specific solutions at this point, what we can do is test a proposition – the final part of your Opportunity Statement.
This is where we focus on the outcome we hope to deliver, and ask:
“If we were able to help you achieve [this outcome], what kind of impact would that have?”
We’re not getting into the how just yet. We’re not describing features or functionality. We’re simply asking if the outcome itself feels valuable and meaningful.
This is the beginning of your value proposition.
We’re trying to find something so compelling that users say:
“Yes – if you could do that, I’d want it immediately.”
You’ll likely need to test multiple versions of these propositions. That’s normal. But your goal is to find the outcome that truly resonates.
Once you’ve found it – once you’ve validated that this is something users really care about – then, and only then, should you start exploring what it might take to deliver it.
4. Summary
Product development typically requires us to answer two key questions:
- Can we build it?
- Should we build it?
Everything we’ve done so far has focused on the second question – and for good reason. It’s usually far easier (and cheaper) to figure out whether something is worth building than whether it’s technically feasible.
You can spend huge amounts of time, money, and energy proving that something can be built – but if it doesn’t move the needle for your users, it’s all for nothing.
Yes, you could find yourself in the opposite situation: users desperately want what you’re promising, but the solution turns out to be technically unachievable. But in my experience, if you’re solving a worthwhile problem, there are usually multiple ways to approach it. Starting with desirability gives you room to pivot on the how – without wasting resources on technical challenges that may not even matter to users.
And now, if you’ve identified a clear proposition that your users genuinely care about, then congratulations, you’ve earned the right to build. That’s when product development really begins.
In the next blog, we’ll explore how to move from proposition to prototype, and how to use prototyping not just to impress stakeholders, but to reduce risk and learn as fast as possible.
🚀 This post is part of a wider guide I’m developing to help research-led innovators move from idea to impact.
📥 A downloadable version of this guide – plus bonus tools and templates – will be available soon. Watch this space!
💬 Have questions about your product idea or want to chat about your approach?
You can book a free 1:1 call with me here.

